Intermediate xLIB Tutorial
by Luby
xLIB 204
Credits: 1.5
Prerequisites: You've already read the beginner's tutuorial or teacher's approval
Now that you've gotten your feet wet and are comfortable xLIB, I will show you some more advanced (and useful) features.
Draw Rectangles and Lines:
xLIB has a feature that allows you to draw rectangles and lines between any two pixels.
real(12,A,B,C,D,E(,F)
A= what shape do you want
	0 = Black Line
	1 = White Line
	2 = Line that changes pixels from off to on and on to off (XOR'S)
	3 = Black Rectangle, no fill
 	4 = White Rectangle, no fill
	5 = XOR Rectangle, no fill
	6 = Black filled box
	7 = White filled box
	8 = XOR box
	9 = Black Rectangle, White fill
    10 = White Rectangle, black fill
B= Upper left hand corner's X coordinate
C= Upper left hand corner's Y coordinate
D= Lower right hand corner's X coordinate
E= Lower right hand corner's Y coordinate
F= Update LCD? (1= yes, 0= no) {If you ommit F, it will default to 1, so I usually leave it out)
Saving and Recalling pics:
Have you ever run out of pics? Been sick of only having 10 to work with? Are you tired of having to do:
If X=1
RecallPic 1
If X=2
RecallPic 2
Well, xLIB has the 2 functions for you. It allows you to store 255 pictures and recall them easily, even when the pics are archived! It's like magic!
Storing/Deleting pics:
real(9,A,B
A= Function (1=store, 2=delete)
B= Pic Number 1-255 (Pic0 is actually Pic10, remember that!)
Notes: Most of the time, you need to delete the pic before you store to it again
real(9,1,10
real(9,0,10
and also, when you look in your memory management, you will notice all sorts of funny names that are 767 bytes long. Don't worry. The TI-OS doesn't know what to call these extra pics, so it just picks something and sticks it on as a name.
Recalling pics:
Now, how do you recall those pics you've saved?
real(3,A,B,C
A= Pic number
B= How do you want it on? (0 = Overwrite, 1 = AND, 2 = OR, 3 = XOR)
C= Update LCD? (0=no,1=yes){omitable}
Now for a bit more complicated one.
Tile Map Generator:
What is a tile map, you ask? well, a tile map is a bunch of sprites drawn usually to resemble a map of some kind.
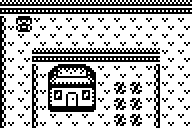
This is a tile map. Ignore the character, he was added on.

Now, you may be asking your self how one would make a tile map. Well, we do this by combining a pic and a matrix. Take your spritesheet and start counting sprites. The one in the upper right hand corner is 0. This is (usually) your "nothing here" sprite and is usually blank. Keep counting to the right 1,2,3,4,5,6,7,8,9,10.11 and when you hit the edge of your calc, jump down to the next row and start counting again from the left (12,13...). Now that you have your numbering down, you can start to make your Matrix. I would suggest a tilemap maker like PyroEditor to assist with this.
Here is the spritesheet that was used to make the tile map.
![]()
The creator wanted the wall in the upperlefthand corner so, in his matrix, at 1,1 (the first element) he put 2. He continued the wall all the way across the top. Then, he added the outside wall (3) on the next row.
[2,2,2,2,2,2,2,2,2,2,2,2]
[3,0,0,0,0,0,0,0,0,0,0,0]
He finished his tile map and stored it to [A]. Now, he was ready to use xLIB.
real(2,A,B,C,D,E,F,G,H,I,J,K,L,M
look at all those parameters
A= Which Matrix? 0=[A] 1=[B] ... 9=[J]
B= Where should xLIB start reading your matrix? (X Coordinate offset)  If you had a bigger map then 8*12, you could say, I want the map to start
   at 5,1 instead of 1,1 by putting a 4 here.
C= Where should xLIB start reading your matrix? (Y Coordinate offset) See B.
D= How wide is your matrix?
E= How tall is your matrix?
F= What collumn should xLIB start drawing?  If you want a 2 collumn space from the left before the map starts, put a 2 here.
G= What row should xLIB start drawing? See F.
H= What collumn should xLIB stop drawing? If you want a 8*8 tilemap instead of a 8*12, put a 8 here instead of 12
I= What row should xLIB stop drawing? see H
J= What pic should xLIB copy the sprites from?  If you fill up, say, pic1 with all sprites, then xLIB would continue reading sprites off of pic2.
   So, if you have 110 in your matrix, it would read the 24th (110-96) sprite off of the next pic sequentily (Pic0 is Pic10)
K= Sprite method.  (0=Overwrite 1=AND, 2=OR, 3=XOR)
L= Size of tiles (sprites) 8=8*8 16=16*16
M= Updated LCD (0=no 1=yes){omitable}
So, for that tilemap above, Matrix [A] looks like this:
[2,2,2,2,2,2,2,2,2,2,2,2]
[3,0,0,0,0,0,0,0,0,0,0,0]
[3,0,2,2,2,2,2,2,2,2,0,0]
[3,0,3,11,12,13,0,0,0,4,0,0]
[3,0,3,8,9,10,0,14,14,4,0,0]
[3,0,3,5,6,7,0,14,14,4,0,0]
[3,0,3,0,0,0,0,14,14,4,0,0]
[3,0,3,0,0,0,0,0,0,4,0,0]
And the spritesheet is in pic0 resulting in this
real(2,0,0,0,12,8,0,0,12,8,0,0,8,1
Whew. Pat yourself on the back if you understand that. It is one of xLIB's most powerful tools