First of all, you need unzip the files. The files you need to send to your calc are in the folder callen "Bin". This folder has three subfolders, each describing the calc models. You need the files in the folder that matches the name of your calc model.
Then you need to send all the files in the calc spesific folder. Now they should appear in a folder called "editor". If they don't, you need to create that folder manually, and move the files into it.
Now i highly recomend that you archive all the files.
Additionaly, you should have the game itself installed on your calc. As a minimum, the files:
MUST be on your calc, and they should be in the folder "mario". This is because those files contain all the graphics and background images.
Now everything should be ready to launch the editor.
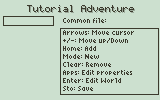
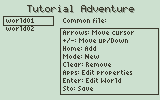
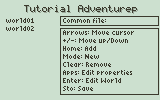
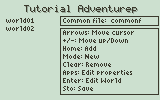
To start the program, type "editor\edit" and press enter. Alternatively, you can select the program "edit" from var-link and press enter.
Manipulate levels | Now, let's create a level!
To be able to manipulate the levels, press "F5".
Now the help text says "Levels: Arrovs: Select Enter: Edit"
|
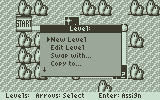
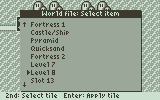
Level options | Move the cursor to level tile "1" and press enter. This will bring up a menu with the options:
New level: Create a new level in this slot
Edit level: Edit an existing level in this slot
Swap with...: This lets you swap this level with another one in the same world. For example you can swap level 1 and 3.
Copy to...: This will duplicate the level in another level slot in the same world. The level will not be saved twice, it will just
be linked to two different slots.
Delete: Delete the level. If level is duplicated with the command above, the level won't be deleted, the current slot will just not link to it anymore. |
| Tilemap editor: Level |

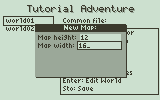
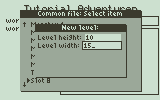
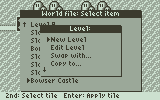
Enter level sizes | Select "New level" and press enter. This will bring a dialog box asking for height and width.
The max and min sizes are the same as for the map, min = 10x15 and max = 255x255 |
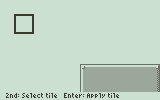
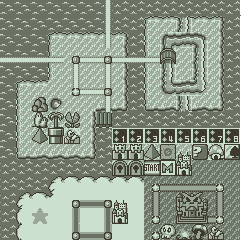
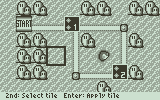
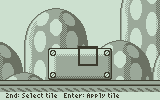
Blank level with background | After entering desired height and width, you appear on a blank level. The help text now says "2nd: Select tile Enter: Apply tile", which indicates that we now are in the level tilemap editor. Use the same approach as for the map to draw some tiles.
You can now display the tileheet by pressing "2nd". The procedure is the same as for the map tile editor:
Navigate with arrows, select tile with enter and paste tile with enter. |
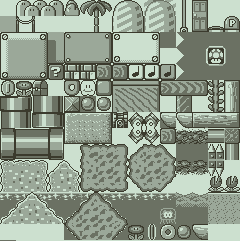
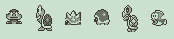
Complete Level Tilesheet | Some special tiles:
There are some special tiles we will take a closer look at.
 | "Bonusbox":
You know this, it contains some kind of useful item. When you paste it it the level a menu wil pop up. This will let you select what to put inside the bonusbox. There will also be a checkbox to select whether or not the tile will be hidden. |
 | "Brick":
Those can contain an item too if you want. A similar menu will appear when using this tile. Also, as you can see in the tile sheet there are two adjacent bricks. Selecting the one to the left will give you a normal brick, selecting the one to the right gives you the option to hide an item inside it. |
 | "Wood block":
This can contain a power-up. Select the one to the right in the spritesheet to hide a power-up in it. |
 | "Note block":
This can contain a power-up. It can also be hidden. |
 | "Dark Note block":
This can be the start point of a trigger. We will look at triggers later. This can also be hidden. |
 | "Treasure box":
This contains an item that will be saved for later use, in the player's item list.When Mario collects one of those, the level is completed.
| | Random: Mushrom, flower or racoon suit. |
| | Star: Makes mario immortal for some time. |
| | Whistle: The Warp Zone! |
| | Hammer: Makes mario able to reveal hidden paths in the map by breaking rocks. |
| | P-Wing: Racoon suit + Mario will be able to fly without running an entire level. |
| | Cloud: Mario can bypass a level in the map with this. |
| | Anchor: Will prevent the airships from flying away. |
|
 | "Flower":
A power-up. Mario can shoot fireballs. It also has an underwater equivalent. |
 | "Coin":
Collect 100 of them and get an extra life. It also has an underwater equivalent. |
 | "Falling block":
This will start to shake for a short time, then fall when mario steps on it. |
 | "Cannons":
Those can shoot bullets at you! When you use it a menu will appear, as usual.
The parameters and their meaning:
"Shot interval": How long (in frames) between each shot. 15-17 = approx 1 sec.
"Direction": Which direction the shots will travel. (only for horizontal cannons).
However, if you press "esc" in that menu the cannon won't fire any bullets.
|
 | "Ladder":
Mario can climb using this. |
 | "Quicksand":
Mario will be sucked down in it, and has to struggle to get up.
|
 | "Level End":
The end of a level. Remember to add the decorative borders around it.
|
 | "Door":
The starting point of a trigger. We will look into triggers later.
|
 | "Pipes":
Those can also be the start point or end point of a trigger.
|
 | "Hostiles":
These are hostiles that will kill Mario! | |
| After working with your level for some time you might need to insert some rows and columns here and there, or maybe remove some of them.
You can do this by pressing shift.
A menu will reveal itself. If you select to insert rows/columns you will be asked how many rows/columns to insert.
I recomend you to play around a little bit with the tilemap editor and the different tiles.
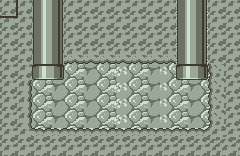
Now, let's say that we draw the level described in the picture to the below. We'll need those pipes later.
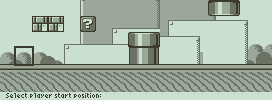 |
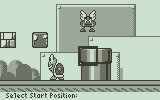
| The player's start position and level borders: |
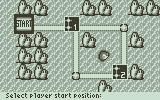
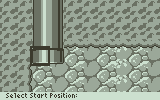
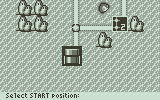
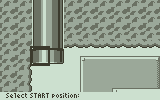
Selecting player's starting position | To select where the player will start when entering the level, press "Mode".
The help text will now say "Select player position:". Use the arrows to navigate, and enter to select the desired position.
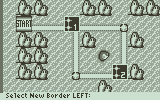
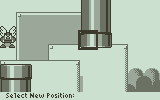
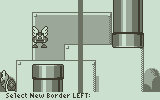
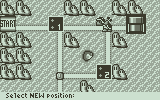
Now the help text will change to "Select border LEFT:" and a thick black line will indicate the current border setting.
You move the border with the left/right arrays and select it's position with enter. |
Selecting a border's location | This border has exactly the same function as the map borders we looked at previously.
It is an invisible line that the player can not pass or see behind.
They can be used to split the map up in different parts separated by Wrapper pipes/Triggers. This way you can hide secret areas.
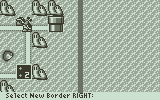
After selecting the left border you will be asked to select the right border.
|
| The background: |
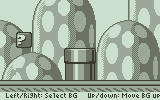
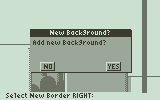
Selecting background and its vertical position | Now, let's see how you can change the background image of the level.
First you need to press "F2". The help text at the bottom of the screen should now say "Left/Right: Select BG Up/Down: Move BG Up/Down".
And that's exactly what nou need to do: You can browse through all the available backgrounds with the Left/Right arrow keys.
When you have found the background you want you can adjust it's vertical position with the up/down arrows.
When finished, press enter.
This should take you back to the tilemap editor.
|
| The monsters: |
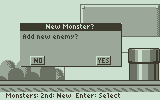
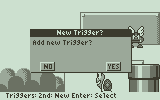
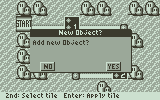
Confirm adding a new monster | Now it's time to add some action to our level!
To enter the enemy editor, press "F3".
If there is no enemies in the level already, a dialog will ask you to add a new enemy.
|
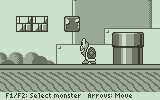
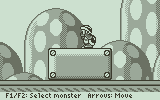
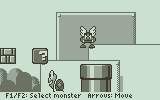
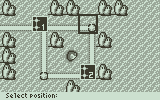
Selecting monster type and its position | When this dialog box doesn't appear automaticly, press "2nd" to add a new enemy.
Press enter to answer yes. Now a goomba will appear, and the help text will say "F1/F2: Select monster Arrovs: Move".
This means that you can browse through all the different types of monsters with F1/F2 and select it's position with the arrow keys.
Diamond speeds up movement as usual.
Let's select a turtle this time. Press F2 once, and the turtle should appear.
When you have selected the desired location and the monster you want, press enter.
|
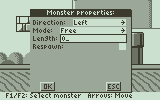
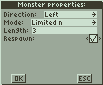
Editing the enemy's properties | Many of the monsters have more parameters and options that just type and position. Our turtle, for example.
In those cases a dialog box will appear.
For eaxmple, the Turtle's options dialog will look like the image to the left:
|
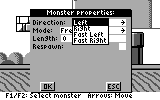
Options for direction | In the first dropdown you can select which starting direction, and speed the turtle will have.
Note that "Fast left" and "Fast right" are twice as fast as the normal speed of the turtle.
|
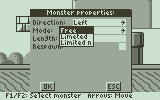
Options for << mode >>, or behaviour | The second dropdown describes which pattern the turtle will walk.
"Free": It will walk in the starting direction until it meets an obstacle, then turn. It will fall down edges, if any.
"Limited": It will walk in the starting direction until it meets an obstacle or an edge, then turn.
"Limited n": It will walk n tiles in the starting direction, then turn.
"Lenght": This is only valid if mode is set to "Limited n". This inputbox takes the distanse the enemy will walk before turning.
"Respawn": If you check this checkbox the enemy will respawn after getting killed. It will respawn when it is outside the screen.
Use the up/down arrows to move between the different dialog elements.
Press enter to save your changes, or esc to cancel.
|
| Click here to view a complete list of enemies and their paramaters. |
Two monsters in our level | Let's add another enemy. Press "2nd" again. Browse with "F1/F2" until you get the goomba with wings, then press enter.
This didn't bring up any dialog, so this means that this enemy has no other parameters than type and position.
Now we have two enemies. The help text should now say "Monsters: 2nd: New Enter: Select".
Now you can browse through the enemies you have added by using left/right arrows. The square cursor will indicate which monster is selected.
If you now press enter, you will go through the same precess as previously. You will be able to edit the all the parameters for the monster including type and position.
That's basicly how the enemy editor works.
If you want to get back to the tilemap editor you can press "F1", or "F2" to go to the Background selector. |
| Triggers: |
| The next thing we will look at is the triggers. Triggers are a level component that introduces more interactivity and complexity into the game play.
In short, we can say that their function is to take Mario from one place to another.
The wrapper pipes are handled by triggers, so are the the Dark Note Block and the Doors.
As mantioned, a trigger takes Mario to a new position. But also, a trigger can alter the background, and the Motion borders.
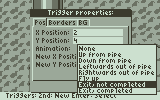
The structure of a trigger:
A trigger contains 9 elements:
X:
Y:
NewX:
NewY:
Border_left:
Border_right:
Anim:
NewBg:
NewBgOffset:
X &Y:
The X & Y coordinate of the position of the trigger, i.e. "start position"
NewX & NewY:
The X & Y coordinate of the position to transfer Mario, i.e. "New position"
Border_left & Border_right:
The left and right side border to apply after Transfering Mario to the nev position
The borders are very useful when making complex levels: They let you create secret areas easily.
They let you divide your level in different sectors that you can only travel between through doors/pipes etc.
Anim:
This tells which animation to use after transfering mario.
Available options:
-No animation: Often used by doors
-Out of pipe:Up/Down/Left/Right
-Flying up: Often used by the Dark Note Block
-Exit level: Completed.
-Exit level: Not completed.
We will look at those two "Exit level"-options when we look at the map triggers and the common file.
NewBg:
This holds information on whether or not to apply a new background after transfering Mario to the new position.
This is very useful when transfering Mario between areas with two different themes, like from outdoors to underground, or up to the skies etc.
NewBgOffset:
This holds the Background Y offset to apply after transfering Mario, if the background has been changed. |
Confirm adding a new trigger | First we need to make sure that there are a couple of wrapper pipes in our level.
You can go to the tilemap editor by pressing "F1" and add some wrapper pipes to your level.
After doing this you press "F4" to go to the trigger editor.
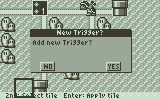
If you haven't added any triggers to the level already, a dialog now should ask you "Add new trigger?".
If it doesn't appear, press "2nd" to display it.
Press enter to answer yes. |
Trigger's starting position | The first thing we need to do is to select the trigger's starting position. The help text should now say "Select start position:".
There are some limitations where a trigger can start. They can only start from a pipe, a door or a dark note block.
Previously we added a couple of wrapper pipes, let's use one of those! Move the cursor to the top of the pipe, and press enter.
|
Trigger's end position | Now the help text asks us to select the player's new position. That is where Mario will appear when executing the trigger.
Now you can select any position, there is no limitations here.
|
Locating a new border to be valid after the trigger is executed | The next thing you need to do is to select the new borders. Those borders are the same stuff as we edited earlier, when we selected the player's start position. But the borders we set now will be valid after the trigger has been executed.
The help text will now say "Select NEW border left" then "Select NEW border right".
The new borders are quite handy because it makes it possible to transfer mario to a different section of the level which is not accessable elsewhere. |
Confirm or reject adding a new background to be used after executing the trigger | After setting up the new borders a dialog will pop up. It asks if you want to add a new background.
The meaning of this is:
If you answer yes by pressinging enter and select a background, the new background will be applied after executing the trigger.
If you answer no by pressing esc, the background will not change when the trigger is handled. Both of those can be useful.
|
Selecting a background | You select the background the same way as earlier: Browse through the backgrounds with left/right and adjust it's position with up/down.
|
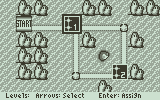
| After finishing the trigger, you should return to a screen that looks like this:
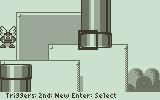
Our level with triggers at the pipe's location
The black rectangular cursor is now positioned at the new trigger's position.
As the help text says, you can now press "2nd" to add a new trigger. If there is more than one trigger you can browse through them with left/right. You can delete the current trigger with the "Clear"-button.
By pressing enter you can edit the selected trigger. The procedure will be the same as when we added a new trigger. |
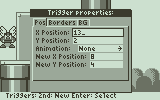
Editing all trigger properties | But, if you press "Diamond" a dialog box will appear. Here you can edit the trigger's properties numerically.
The first tab is called "Pos" for positions.
"X and Y position" are the starting positions for the trigger, while "New X and Y position" is the new positions (Mario's new position) after the trigger is executed.
|
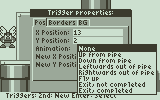
Animation Options | The field "Animation" tells which animation will be used at the "end" of the trigger, at Mario's new position. For example, Mario will rise up from a pipe etc.
When the NEW position is at a pipe, the animation will be selected automaticly.
At the bottom of the list you'll see the options "Exit, not completed" and "Exit, completed".
When using those the trigger will be the end of the level, treating the level as completed/not completed.
We will look at the use of those when we look into map triggers.
|
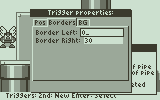
Border's edited numerically | The next tab is called "Borders", and the two fields is simply the new borders to be used after the trigger is executed. |
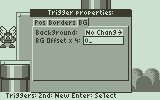
Background options | The final tab is called "BG" for background. Here you can select whether or not to apply a new background after the trigger is executed.
The field offset describes the vertical position offset (the same as moving it up and down with the arrows in the background selector).
Enter will save your changes and esc will cancel, as usual.
To go back to the tilemap editor, you can now press "F1", or "F2" to go to the background selector etc.
|
| Flying Platforms: |
| We will look at the flying platforms next.
The flying platforms are all those pieces of wood that flies through the air, up and down, left and right, or diagonally.
Some of them are stationary until you step on them, then they start to fall. |
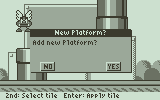
Confirm adding a new flying platform | To go to the Flying platform editor you need to press "F5".
Now a dialog should ask you to add a new platform (if you haven't done that already).
The controls are exactly the same here as for the enemies:
Left/Right to browse between existing platforms, press "enter" to edit, "clear" to delete and "2nd" to add a new one. |
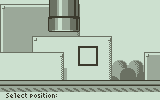
Select a platform position | After answering "yes" to the new platform dialog, a cursor appears on the screen and the help text says "Select position:".
You select the flying platform's initial position with arrows and enter as usual. |
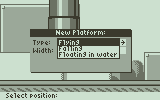
Platform type options - | Then a dialog box pops up. The first element is a dropdown menu that lists the different options that are available.
The options and their meaning:
| Flying | Use this if you want to add a platform that moves around in the air automatically.
They can move horizontally, vertically, or diagonally. |
| Falling | This is a platform that is stationary at first, but will start falling once Mario steps on it. |
Floating
in water | This one just dups up and down half a tile height (8 pixels). It is designed to be used in the water surface, but it will work fine elsewhere too (for example; in lava ;-)). | |

- and platform width | The second element is a text field called "Width":
This is the width of the flying/falling/floating platform in tiles. Width = 2 will give two tile widths = 16*2 = 32 pixels wide.
The minimum width is 2.
Now, if you selected "Falling" or "Floating in water" the platform is finished and should appear in your level. |
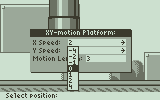
Speed and direction options,
Negative is upwards! | But, if you selected "Flying" another of those dialog boxes will pop up. This one is titled XY-motion platform.
There are 2 dropdowns and a text field.
The dropdowns is called "X speed" and "Y speed". Those menus holds all the available speed and direction options available.
For "X Speed" there are "0","1","2" and "4". 2 is the most commonly used speed in the SM68K levels.
For "Y Speed" there are some more options: "-4","-2","-1","0","1","2" and "4".
The negative numbers indicates motion in the negative Y direction. THAT IS UPWARDS! It might seem illogical to some, but that's the way it is. So, negative Y-speed and the platform travels upwards from it's start position, and positive y-speed will make it go down.
And, of course a speed of "0" in any direction will make it not move in that direction ;-) |

The platform's move length | The text field at the bottom is labeled "Motion length":
This is the motion length in tiles.
"Motion length" = 4 will give 4*16 = 64 pixels motion length.
If Both X and Y motion is enabled the traveled distance in the X direction (horizontally) will determine when the platform turns and moves in the opposite direction.
For example:
"X speed" = 2
"Y speed" = -4
"Motion length" = 4
This will make the platform turn and start moving back when it has moved 64 pixels (4 tiles) rightwards.
At this point it also has moved 128 pixels (8 tiles) up, since the Y speed is set to twice as fast. |
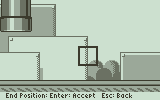
Accept or reject ending position | After selecting the X and Y speed and motion length the cursor will indicate the end position of the platform, i.e. how far it will travel before it turns and starts going back.
If you are satisfied with this position you can press enter, or press esc to change the speeds and motion lenght, as the help text indicates ("End position: Enter: Accept Esc: Back"). |
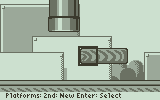
Our platform shown in it's position | After pressing enter the platform will appear in your level at it's start position. |
| Now you can browse through all the platforms in the level in the same manner as you browsed through the enemies earlier:
"Left/Right" to browse, "clear" to delete, "Enter" to edit the current platform.
Also, "2nd" will add a new platform. |
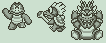
The three available bosses | The Bosses: |
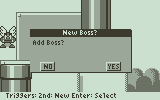
Confirm to add a boss to the level | The last, but not least element you can add to your level is the boss.
To add a new boss (or edit an existing boss) press "Home".
If there is no boss in the level already, a dialog will ask you to add a new one, as usual.
Now a boss sprite will appear on the screen. |
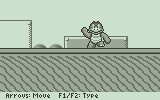
Selecting a boss type and its location | The help text will now say "Arrows: Move F1/F2: Type".
You select it's position with the arrow keys.
"F1" and "F2" will let you browse through the available boss types. When you have selected the boss type and the position you want, press enter.
To go back and edit the boss, press "Home" again.
NOTE:
If you select Bowser, that level will end the entire levelset when Bowser is defeated! |
| Save the level: |
Saving the level
If you change the filename, the level will be
saved in another file. The file must already
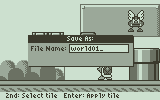
exist! | Now it's time to save the level. Press "Sto->" and a dialog box will ask you to confirm the save.
When you confirm, another dialog box will ask you to confirm the file name. The file name field will already hold the current filename, but you can enter other names if you want. However, there must already exist a level file with the name you enter.
This way you can copy a level between different files. |
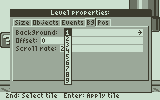
| Level Properties: |
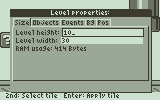
Edit the size of the level | Now when we have been through all the parts that can make up a level it's time to have a look at the level properties dialog box.
Press "APPS". Now a little heavier dialog box will appear.
At the top you see some tabs. The first tab will be named "Size".
The two text fields will hold the level's height and width. You can change the sizes here, and a dialog will ask you to confirm after pressing enter. If you do resize the level, the new rows will be added at the bottom and the new colomns will be added at the right edge of the level. The content will be preserved.
Below those there is a text field indicating how much RAM the level will require in it's current state, to be able to play. |
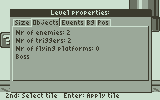
View object count | To switch to the next tab, press "APPS". The next tab is called "Objects" and indicates the number of different objects like enemies, triggers and flying platforms.
There's nothing to edit here. |
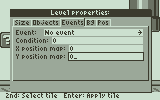
Add events to your level
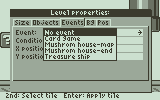
Event options | The next tab is called "Events". Here you can add an event that will occur under some given circumstances when the level is completed.
The first dropdown is called "Event" and has the following options:
| No Event | The default setting, the level will exit normally. |
| Card game | If the condition is right, a card game will appear on the map. |
| Mushroom house - Map | If the condition is right, a new mushroom house will appear on the map. |
| Mushroom house - End | When entering the black area at the end of the level, Mario will be transferred to a mushroom house if he is behind the forground tilemap; Mario goes behind the foreground by ducking down on the white box for some time. |
| Treasure ship | IF the condition is right, a treasure ship will appear on the map. |
| Doom Ship | This option is only available when you edit a level in slot 7 - The big castle that usually ends the world. You must enable the release of the doom ship here in this menu to make it appear. |
| End - No ship | This option is only available when you edit a level in slot 7 - The big castle that usually ends a world. If you select this, there won't be a doom ship released, and the castle will end the world. |
Condition:
This indicates when the event is supposed to occur. If you enter "50" in this text field, the player has to collect exactly 50 coins in the given level to trigger the event. (not valid for "Mushrom House - End", "Doom Ship" and "End - No Ship")
X Position Map and Y Position Map:
Those are the Map coordinates for which the event will occur, where the mushrom house/card game/treasure ship will appear. |
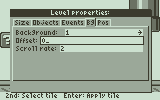
Edit background properties
A list of all available backgrounds | The next tab is called BG, short for BackGround.
The first dropdown will let you select which background to use.
The field called offset is basicly the same as moving the background up and down in the background selector ("F2").
The field scroll rate describes how fast the background will scroll relative to the foreground (tilemap).
For example, entering "1" will make the background scroll at the same speed as the foreground, "2" makes it scroll at half speed, "3" at one third of the speed etc.
Note that This is the initial Background settings. Triggers can change the Background and the offset, but NOT the scrollrate. |

Description | The next tab is called "POS", for Position.
Under this tab there are 4 textboxes:
"Border left"
"Border right"
"Player start X"
"Player start Y"
"Border left" and "Border right" :
This is the level borders that will be valid when the player enters the level.
It is in fact exactly the same borders that you set by pressing "Mode", but here you can edit them numerically, which can be handy in some cases.
"Player start X" and "Player start Y" :
This is the X and Y coordinates of Mario's start position in the level.
This is also exactly the same position as you set by pressing "Home". |
| Now we'll go back to the same map as we edited previously. Select that world in the world list and press enter to edit the map. |
| Map objects |
 | The map objects are all free moving object on the map. Some examples are the map monsters that you meet in almost every world in SM68K, and also the boats in world 3 and 6 and the moneyship, card game etc.
Map monsters and boats are the only types of map objects you can add directly. We'll look into the monsters now.
To go to the object editor you need to press «F2».
As usual a dialog will ask you to add a new object, or you can press «2nd». |
 | The first thing we'll do is to select the object's position, as the help text indicates. |
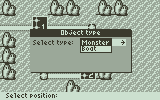 | Next, a dialog box appears. Here we select if the object will be a Map Monster or a Boat.
Let's select Monster this time. |
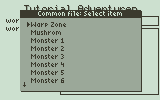
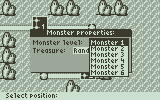 | Now another dialog box appears. This has two dropdowns. The first one is called «Monster Level» and the second one is called «Treasure».
The first one describes which of the monster level slots in the common file to load when mario encounters this specific monster. So, since we added a monster level in the slot called «Monster 1» we'll select Monster 1 for this one. We'll see that the small monster level we made will be loaded when mario meets this creature. |
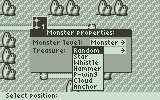 | The second dropdown simply tells which item Mario will win if he defeats the monster.
If you select «Random» here, he will get either a Mushrom, a Fire flower or A Racoon Suit.
When pressing enter you'll see that the monster appears on the map. While playing the monsters will move randomly around on the map.
Like all the level objects we have been through you can browse through the map objects if you have more than one, and edit them by pressing enter. |
| NOTE: It is important that you place the monsters in road nodes only. By road nodes i mean all places mario can stand, like the «dots» on the roads, level / castle / pipe / mushrom tiles, the «Start» tile etc. If not, they might start moving in a weird pattern. |
| Map Triggers |
| Now it's time to look at the map triggers.
The map triggers are quite similar to the level triggers:
They take you from one location on the map to another. Additionaly, they can take you to another map. This is used in the warp zone.
However, there are some differences:
When a map trigger is handled, like when the player enters a map pipe, a level is loaded. The MAP trigger specifies one of the LEVEL triggers of that level that is considered as an exit. When this LEVEL trigger is handled, the level is considered as completed. And the player arrives at the new map position.
The new borders will now become active.
However, if the player exits the level through another level trigger, the level is considered as NOT completed and the player stays at the current map position.
The content of a map trigger:
X & Y:
The position of the trigger
NewX & NewY:
The new position, i.e. where you arrive when executing the trigger
LevelNr:
Describes which level to load when entering a trigger (Like the underground tunnels found in world3 of
sm68k or the castle that brings you up to the skies in world7 of sm68k).
LX & LY:
This is the players start position in the level. The start position specified by the MAP trigger is used, the start position specified by the level itself is ignored.
Exit:
Describes which of the LEVEL TRIGGERS in the selected level that is used as an exit. When this exit trigger is handled (the player enters the selected pipe ) the level is considered as completed, and the map trigger is handled: The player arrives at the New position and the new borders become valid.
NewMap:
This tells if, and which map to load when the trigger is handled. This is used in the warp zones, though it is fully possible to use it on a regular map (this has been accidentaly tested... ).
No level is loaded in this case.
NewBorder_left & NewBorder_right:
Similar to the level borders: You can not access the area behind the current borders. Can be used to hide certain parts of the map. An example is world7 of sm68k. After completing the first pipe you arrive on a sky part of the map, and the ground is now not accessible.
Color:
This specifies which color theme the new map segment has. This is used when breaking rocks, unlocking "map doors" etc. The reason this field exists is for the game engine to know which color of the tile to substitute the rock/locked door with.
This will possibly be handled automaticly in a future version of the editor. |
 | Before we can add the first map trigger we should add a couple of pipes to our map like shown in the image. |
 | Then we press «F3» to go to the trigger editor. As usual a dialog will ask us to add a new trigger. If not, press «2nd». |
 | The first thing we'll do is to add the starting point of the trigger. Lets select one of the pipes. |
 | Now a dialog pops up. This one asks for the destination map. That is which map Mario will appear on when the trigger is executed. So if you select «Current world» mario will appear on a new location on the same map. If you select «New map» he will be transferred to another world. This is what is used in the warp zone. In this case we will select «Current world» |
 | Then the help text on the bottom of the screen asks us to select new position. Now we should select the second pipe. |
 | After that you have to select the new borders. This is the map borders to be used after the trigger is executed. |
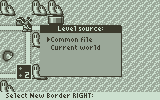 | After this another dialog box appears. This one want us to select «level source», that is from which file the trigger level will be loaded. As you can see, you can choose between the common file and the current world, i.e. The world we are working on at the moment. It is recomended to keep trigger levels that is used in more that one world in the commonfile to save some space. We select common file here, so we can use the tunnel we made previously. |
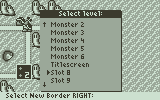 | This brings up a list of level slots in the common file. We select slot 8, where we saved our tunnel. |
 | This will open the level itself. The help text asks us to select start position. That is where Mario's will appear in the level when he enters the pipe.
We select one of the pipes as the start position. |
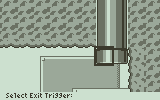 | Next, we will be asked to select «Exit trigger». This is which of the triggers inside the LEVEL that will serve as an exit, i.e. Which of the two pipes Mario must enter to appear on the new map location. If he enters the other pipe he will NOT get transferred to the new spot. |
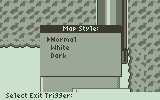 | The final thing that will happend is that another of those dialogs will ask us to select map style. This is the «style», or the look of the map in the new location.
We were using the «Grass» tiles in our map, and therefore we need to select «Normal». But if we used the white «Cloud» tiles at the new map location we would have to select «White» and «Dark» if we used the darker tiles (the «Bowser world» tiles). This will hopefully be handled automaticly in a future version of the editor.
This is used in some internal functionality of the game. If you select the wrong cathegory here, it's not critical. It will only trigger some cosmetic bugs in the map on rare occations (like a light ground tile in a dark style world etc.). |
| Now our trigger is finished.
Note that this trigger only works in one direction. If you want the map pipes to be bidirectional, you have to repeat the process again, in the opposite direction.
A trigger can be used to much more than just passages between two pipes. See World 7 of SM68k for an example. Here you need to make your way through a castle to reach the cloud part of the map.
|
| The level slot list |
 | There is one more thing we should have a quick look at. If you press «Home» in the map editor you will be taken to a list of level slots. There are a total of 20 level slots available in each world.
The elements are:
«Level 1-8», «Fortress 1 & 2», «Castle/Ship», «Pyramid», «Quicksand», «Bonus», «Bowser Castle» and «Slot 13, 14 & 16-18».
As you can see, some of them is not assigned to a specific task, like those named «Slot x». Those can be used to for example trigger levels. Also, if you dont have a pyramid, Quicksand, Bowser Castle, Level X etc. In your map, that slot is also possible to use in a trigger. |
 | To Edit or create a level in one of those slots you need to press enter.
This brings up a menu we have seen before, the level menu. |
 | Goomba, Turtle, Spikey, Beetle, Skeleton Turtle and Fish:
All of those move in the same pattern and have the same parameters. Although, some of them have different attributes.
Turtle:
Leaves behind a shell when killed by jump or racoon tale. The shell will start spinning on contact with mario or the turtle will resurect after some time.
Spikey:
Can not be jumpkilled or killed by fireball.
Beetle:
Will withstand fireballs. Leaves behind a shell, like the turtle.
Skeleton Turtle:
Will not be completely killed. Will fall down into a pile of bones when killed, then resurect after some time. |
 | Motion and parameters:
Those will simply move back and forth. Their motion is configureable:
Parameters:
Direction:
The starting directin of the enemy.
Mode:
-Free:
The enemy will walk until it meets any obstackle, then turn. Falls down iwhen it meets an edge.
-Limited
The enemy will walk until it meets any obstackle or an edge, then turn.
-Limited n
The enemy will walk until n tiles in given direction, then turn. Falls down edges.
Length:
Number of tiles to walk before turning. Only valid when mode is set to Limited n. |
 | Flowers:
They rise, stay up for a while, then goes down and stays down for some time, then rises again. This repeats itself forever. The one to the right will shoot fireballs at Mario.
They can not be jump killed. |
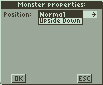 | Parameters:
Mode:
-Normal and upside down: These are quite obvios. |
 | Flying Turtle:
They fly restless in the air. They can be configured to follow different patterns.
Parameters:
X Motion and Y Motion:
-None:
Will not move at all in the given direction
-Move free:
Will fly in the given direction until at reaches an obstacle.
-Move limited:
Will move n tiles, then turn.
This applies to the direction(s) that are set to Move limited (X and/or Y)
Length:
The number of tiles to move before turning. Only valid if at least one direction is set to move limited
As far down as possible (Check Box):
This is only valid if Y motion is set to move limited. Then the turtle will always touch the ground before flying up. Do not use this if the turtle flies above water.. |
 | Boomerang Guy, Fireball Guy & Hammerman
Those will move within a limited area, throving their weapon at Mario. They can hold treasure chasts, which will be released when they are killed. Also, they can appear in pairs. This is only usable when they have a treasure. Then the treasure won't appear until both are dead. |
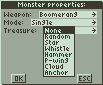 | Parameters:
Weapon:
-Boomerang
-Fireball
-Hammer
Select which of those weapons to equip the monster with.
Mode:
-Single:
Obvious: Only one monster.
-Pair:
This option makes it possible to add a "Brother" to the current monster.
The monsters will not leave behind their treasure until both of them are killed.
After exiting the dialog box you will be prompted to select the position of the Brother.
This option is only useful if treasure is other than "None".
Treasure:
Select which treasure the monster leaves behind when killed. If mode is set to pair, both the monsters must be killed to get the treasure. |
 | Lavaball:
The lava ball jumps up/down from the lava. Then falls back and stays for a given time, before the jump is repeated. |
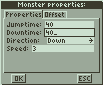 | Parameters:
Jumptime:
The time (in frames) to jump before starting to fall (15-17 approx. 1 sec.)
Downtime:
The time (in frames) between the jumps (15-17 approx. 1 sec.)
Direction:
Select if the lavaball will jump up or down
Speed:
The jump speed. |
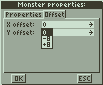 | Offsets:
X offset & Y offset:
Apply an offset of +-8 pixels to the lavaball's start position/rest position. |
 | Ghost:
Will chase Mario when he turns his back on them. Will stop while he faces them. Can be configured to stay within a given area. |
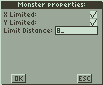 | X Limit & Y Limit:
When any of those is checked there will be a limit in the given direction which the ghost cannot cross.
Limit distance:
The distance (in pixels) the ghost can move from it's starting position before it reaches the limit (if any limit is enabled). |
 | Mad Flower:
They can either stand in one location or be moving around. When moving around is selected, they will always move towards Mario. |
 | Parameters:
Mode:
-Stationary:
The flower will keep it's position, but jumping up when player is above it.
-Walking:
The flower will also move towards the player. |
 | Jumping Fish:
This one will swim back and forth and do a jump on it's way. |
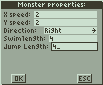 | Parameters:
X and Y Speed:
Simply the speed in the X and Y direction.
Direction:
The starting direction.
Swim Length:
Jump Length:
|
 | Bomb:
They can be configured to behave in many different ways: Walking around, rolling down from their start spot, or to be shot out of a cannon. When walking is selected, they will start counting down to detonation when they are jump killed. Elsewhere, they will explode automatically. |
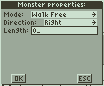 | Mode:
-Walk free:
It will walk in the given direction until reaching an obstackle, then turn.
-Walk Limited:
Walk n pixels in given direction, then turn.
-Falling:
Will fall down from it's start position, and start count down to detonation when reaching the ground. Will reappear at it's start position after exploding.
-Cannon:
Will be shot out from a cannon in the given direction. It starts count down to detonation.
when reaching the ground. Will be shot out of the cannon again shortly after exploding. Only diagonal cannons upwards should be used!
Direction:
Not valid if mode is set to falling.
Length:
The length to Walk in given direction before turning.
Only valid if mode is set to Walk limited. |
| The following monsters have no additional parameters but type and position |
 | Jumping Brick:
This will jump towards Mario when he is close enough. It's very fragile, so it breaks if it jumps into something solid. Will withstand fireballs. |
 | Falling Block:When Mario is close enough they will fall down. Then it goes up to its start position again. Cannot be killed in any way. |
 | Jellyfish:They will swim towards Mario. A little hard to get away from, especially in small and narrow areas. Can only be killed by fireballs. |
 | Orb:
This will simply keep on orbiting forever. Cannot be killed. |
 | ParaGoomba:
Flies up and down in a zig-zag pattern. |
 | Underwater Flower:
This will spit out some slowly moving bullets. You cannot kill this one. |